VCF 9 Home Lab | Embedded vIDM (viDB) — AD Integration, Users, Groups & NSX SSO
Lab Environment
| Component | Detail |
|---|---|
| Platform | VMware Cloud Foundation 9 |
| SDDC Manager | edi-vcf01.edi.vcflab.local (10.11.10.14) |
| vCenter | edi-m01-vc01.edi.vcflab.local |
| Domain Controller | Windows Server 2022 — vcflab.local (10.11.10.4) |
| AD Domain | vcflab.local |
| Switching | Arista DCS-7050TX-64-R (ASN 65000) |
Overview — What is Embedded vIDM (viDB)?
In VCF 9, VMware Identity Manager is embedded directly into the SDDC Manager appliance as a lightweight identity broker — referred to as viDB (vIDM Database). Unlike the full standalone Workspace ONE Access deployment, viDB is purpose-built for VCF's internal SSO and role-based access control needs.
Once configured, viDB acts as the identity federation layer across SDDC Manager, NSX Manager, and vCenter — meaning a single Active Directory login grants appropriately scoped access to all three components based on group membership.
The configuration is done via Operations Fleet Management in the SDDC Manager UI, not the old standalone vIDM interface.
Step 1 — Configure vCenter Identity Source (AD over LDAP)
Before configuring viDB, vCenter needs to know about the Active Directory domain so that SSO can resolve AD users and groups.
Navigate to: vCenter → Administration → Single Sign On → Configuration → Identity Sources → Add
Select Active Directory over LDAP and fill in the following:
| Field | Value |
|---|---|
| Identity Source Type | Active Directory over LDAP |
| Identity source name | vcflab.local |
| Base DN for users | CN=Users,DC=vcflab,DC=local |
| Base DN for groups | CN=Users,DC=vcflab,DC=local |
| Domain name | vcflab.local |
| Domain alias | vcflab |
| Username | administrator@vcflab.local |
| Primary server URL | ldap://10.11.10.4:389 |
| Secondary server URL | (leave blank) |
ldap:// on port 389 for lab use. For LDAPS (port 636) you would need to upload the ADCS CA certificate in the Certificates field. Keep it simple for the initial deployment.
Click Add. No errors should be returned if the DC is reachable on VLAN 1110 and port 389 is not blocked.
Step 2 — Create AD Users and Groups via PowerShell
Before configuring viDB, the required OUs, groups, and service accounts need to exist in Active Directory. Run the following on your Windows Server 2022 domain controller:
# Create OUs
New-ADOrganizationalUnit -Name "VCF-Users"  -Path "DC=vcflab,DC=local"
New-ADOrganizationalUnit -Name "VCF-Groups" -Path "DC=vcflab,DC=local"

# Create AD Groups
New-ADGroup -Name "vcf-admins"     -GroupScope Global -Path "OU=VCF-Groups,DC=vcflab,DC=local" -Description "VCF SDDC Manager Admins"
New-ADGroup -Name "vcf-operators"  -GroupScope Global -Path "OU=VCF-Groups,DC=vcflab,DC=local" -Description "VCF SDDC Manager Operators"
New-ADGroup -Name "vcf-viewers"    -GroupScope Global -Path "OU=VCF-Groups,DC=vcflab,DC=local" -Description "VCF SDDC Manager Viewers"
New-ADGroup -Name "vcf-nsx-admins" -GroupScope Global -Path "OU=VCF-Groups,DC=vcflab,DC=local" -Description "NSX Admin Group"

# Set password
$password = ConvertTo-SecureString "VMware1!" -AsPlainText -Force

# Create Users
New-ADUser -Name "vcf-admin"       -SamAccountName "vcf-admin"       -UserPrincipalName "vcf-admin@vcflab.local"       -Path "OU=VCF-Users,DC=vcflab,DC=local" -AccountPassword $password -Enabled $true
New-ADUser -Name "vcf-operator"    -SamAccountName "vcf-operator"    -UserPrincipalName "vcf-operator@vcflab.local"    -Path "OU=VCF-Users,DC=vcflab,DC=local" -AccountPassword $password -Enabled $true
New-ADUser -Name "vcf-viewer"      -SamAccountName "vcf-viewer"      -UserPrincipalName "vcf-viewer@vcflab.local"      -Path "OU=VCF-Users,DC=vcflab,DC=local" -AccountPassword $password -Enabled $true
New-ADUser -Name "vcf-svc-nsxmgr"  -SamAccountName "vcf-svc-nsxmgr"  -UserPrincipalName "vcf-svc-nsxmgr@vcflab.local"  -Path "OU=VCF-Users,DC=vcflab,DC=local" -AccountPassword $password -Enabled $true
New-ADUser -Name "vcf-svc-sddc"    -SamAccountName "vcf-svc-sddc"    -UserPrincipalName "vcf-svc-sddc@vcflab.local"    -Path "OU=VCF-Users,DC=vcflab,DC=local" -AccountPassword $password -Enabled $true

# Assign group memberships
Add-ADGroupMember -Identity "vcf-admins"     -Members "Administrator","vcf-admin","vcf-svc-sddc"
Add-ADGroupMember -Identity "vcf-operators"  -Members "vcf-operator","vcf-svc-nsxmgr"
Add-ADGroupMember -Identity "vcf-viewers"    -Members "vcf-viewer"
Add-ADGroupMember -Identity "vcf-nsx-admins" -Members "vcf-admin","vcf-svc-nsxmgr"| User | Group | Purpose |
|---|---|---|
| vcf-admin | vcf-admins, vcf-nsx-admins | SDDC + NSX admin |
| vcf-operator | vcf-operators | SDDC operator |
| vcf-viewer | vcf-viewers | Read-only access |
| vcf-svc-nsxmgr | vcf-operators, vcf-nsx-admins | NSX service account |
| vcf-svc-sddc | vcf-admins | SDDC service account |
| administrator | vcf-admins | Domain admin + VCF admin |
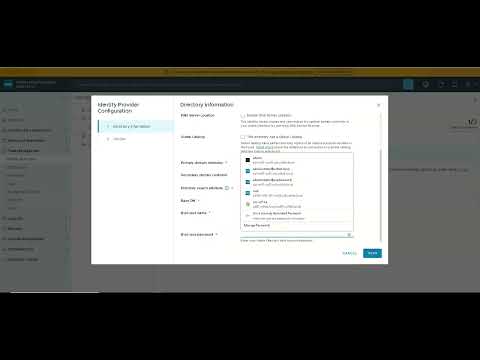
Step 3 — Configure Embedded vIDM Directory (viDB)
Navigate to: SDDC Manager → Operations Fleet Management → Identity and Access Management → Embedded vIDM
Directory Configuration
| Field | Value |
|---|---|
| Directory display name | vcflab.local |
| DNS Server Location | Disabled |
| Global Catalog | Unchecked |
| Primary domain controller | 10.11.10.4 |
| Secondary domain controller | (leave blank) |
| Directory search attribute | sAMAccountName |
| Base DN | DC=vcflab,DC=local |
| Bind user name | CN=vcf-svc-sddc,OU=VCF-Users,DC=vcflab,DC=local |
| Bind user password | VMware1! |
vcf-svc-sddc@vcflab.local) will fail silently. Use the full CN=... DN as shown above.
Click Test Connection before saving. A successful test confirms the bind account can reach port 389 on the DC.
Attribute Mapping
| vIDM Attribute | AD Attribute |
|---|---|
| Username | sAMAccountName |
| First name | givenName |
| Last name | sn |
| Distinguished name | distinguishedName |
Group and User Provisioning
The embedded viDB only allows a single group and user search base per directory — unlike the full Workspace ONE Access deployment. The solution is to point both at the parent OU so all groups and users are captured in one sync:
| Field | Value |
|---|---|
| Group DN | OU=VCF-Groups,DC=vcflab,DC=local |
| User DN | OU=VCF-Users,DC=vcflab,DC=local |
| Sync nested group members | Enabled |
After saving, trigger a manual sync. You should see 4 groups and 6 users imported successfully.
Step 4 — Assign Roles in SDDC Manager
Navigate to: SDDC Manager → Administration → Users and Groups
| AD Group | SDDC Manager Role |
|---|---|
| vcf-admins | ADMIN |
| vcf-operators | OPERATOR |
| vcf-viewers | VIEWER |
Step 5 — Assign Roles in NSX Manager
Navigate to: NSX Manager → System → User Management → Role Assignments → Add
| AD Group | NSX Role |
|---|---|
| vcf-nsx-admins | Enterprise Admin |
| vcf-operators | Network Engineer |
Step 6 — NSX SSO Registration (API Method)
After completing viDB configuration, NSX Manager reported "VCF SSO not set". The SDDC Manager GUI option to register NSX with vIDM was not present in this VCF 9 build, so the API method was required.
Troubleshooting: Finding the Correct API Credentials
VCF 9 has moved to a fully microservices-based architecture. The SDDC Manager API is fronted by nginx which routes to internal services on ports 7100–7900. The token endpoint is /v1/tokens routed to port 7100 (commonsvcs).
IDENTITY_UNAUTHORIZED_ENTITY when using admin, vcf, and administrator@vsphere.local — because VCF 9 uses admin@local as the local domain format, not admin or vsphere.local.
The correct local admin account format in VCF 9 is admin@local — set during the VCF bringup wizard.
Get API Token
TOKEN=$(curl -sk -X POST \
  https://localhost/v1/tokens \
  -H 'Content-Type: application/json' \
  -d '{"username":"admin@local","password":"<your-sddc-admin-password>"}' \
  | python3 -c "import sys,json; print(json.load(sys.stdin)['accessToken'])")
echo $TOKENadmin@local was used with the correct bringup password, the API returned a full JWT access token with ADMIN scope — confirming the authentication method for all subsequent VCF 9 API calls.
Get vIDM Configuration
curl -sk -X GET \
  https://localhost/v1/vidu/configuration \
  -H "Authorization: Bearer $TOKEN" \
  | python3 -m json.tool
Get NSX Manager Details
curl -sk -X GET \
  https://localhost/v1/nsx-managers \
  -H "Authorization: Bearer $TOKEN" \
  | python3 -m json.tool
Get SDDC Manager Certificate Thumbprint
echo | openssl s_client -connect edi-vcf01.edi.vcflab.local:443 2>/dev/null \
  | openssl x509 -noout -fingerprint -sha256 \
  | sed 's/://g' \
  | awk -F= '{print $2}'
Register vIDM on NSX Manager
NSX_IP="<your-nsx-manager-ip>"

curl -sk -X PUT \
  https://$NSX_IP/api/v1/node/aaa/providers/vidm \
  -u "admin:<nsx-admin-password>" \
  -H "Content-Type: application/json" \
  -d '{
    "vidm_enable": true,
    "host": "edi-vcf01.edi.vcflab.local",
    "thumbprint": "<THUMBPRINT>",
    "client_id": "<CLIENT_ID>",
    "client_secret": "<CLIENT_SECRET>",
    "node_host_name": "<nsx-manager-fqdn>"
  }' \
  | python3 -m json.tool
Key Learnings & Gotchas
- VCF 9 local admin format is
admin@local— notadmin, notadmin@vsphere.local. This is new in VCF 9 and caught me out across multiple token attempts. - Bind DN must be full Distinguished Name — viDB rejects UPN format for the bind user. Always use
CN=user,OU=...,DC=...,DC=local. - Embedded viDB only supports one group/user OU — unlike standalone Workspace ONE Access. Point it at the parent OU to capture all child objects.
- ADFS is not required for VCF lab identity — AD over LDAP covers all VCF identity needs for a lab or PoC. ADFS/OIDC is only needed for production federated identity scenarios.
- VCF 9 is fully microservices-based — there is no monolithic
sddc-manager.service. Services run as individual systemd units (commonsvcs, domainmanager, lcm, operationsmanager) fronted by nginx on port 443. - NSX SSO registration has no GUI button in this build — the API path via
/api/v1/node/aaa/providers/vidmis the supported workaround.
What's Next
With identity configured end-to-end, the next steps in the VCF 9 home lab build are:
- NSX T0 Gateway deployment and BGP peering with the Arista DCS-7050TX (currently in
Idle(NoIf)state) - NSX T1 Gateway and segment configuration
- Workload domain expansion
- Automation via Terraform VMware provider against the VCF API
Farrukh Hanif — Senior Cloud Architect & NSX/VCF Engineer
linkedin.com/in/farrukhhanif
VCIX6-NV | VCP-VCF9 | VCAP-NV Design | CKS | CKA | AWS SA Pro